Easy peasy pea soup

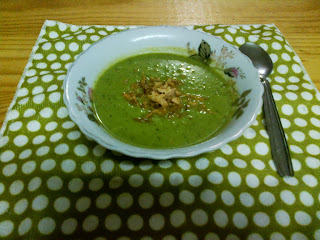
I decided to try something new for Meatless Monday… Pea Soup! which I found in this month's Women's Health magazine… I made some adjustments based on the "whatever I have in the cupboard" rule and it turned out super yum…I even plan on having for lunch today ๐Ÿ˜€

INGREDIENTS:
3 tbsp olive oil
1 onion, chopped
1 clove garlic, crushed (I used a heaped teaspoon of crushed garlic and ginger)
1 green chilli, deseeded and chopped (half spoon of crushed chilli)
1kg frozen petit pois (I used regular frozen peas)
800โ€“900ml chicken or vegetable stock
30g fresh coriander (I used 5g flash dried coriander)
pinch of sugar
sea salt flakes and freshly ground black pepper (I used regular garden variety salt and pepper)

HOW TO:
1. Heat the olive oil in a heavy-based pot over a medium-low heat. Sweat the onion, garlic and chilli with the lid on until softened.
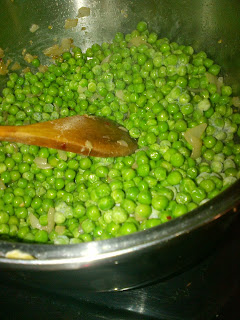
2. Add peas and sweat with the lid on for 15 minutes.
3. Add most of the coriander (reserve a few good-looking leaves for garnish) and the stock. Bring to a simmer.
4. Add the sugar and blitz with a hand-held blender until smooth.
5. Season well and serve immediately, garnished with some coriander leaves and with a fresh loaf of wholewheat bread and butter on the side.
(I added a cup of water to thin it out a bit)
 
Sent from my BlackBerry®

Tasty toffee apples

For the past ten or so years I've been doing face painting at our church's annual fête and as soon as she could my sister joined in…this year we decided (read; my mom decided) we would also whip up some toffee apples…being that it has been ages since we tried and my mom's memory was sketchy at best, "sugar and something…" I googled and found this on http://www.picknpay.co.za we found that the recipe made pretty matt looking toffee apples which is pretty weird but once we cut down sugar by half a cup we were in business…I added the sprinkles because #1 it looks cute, #2 we had left over from making cupcakes… Here is recipe, have fun ๐Ÿ™‚

INGREDIENTS:

15 red apples

4 cups white sugar

1 cup water

3 ml cream of tartar

10 ml red food colouring

HOW TO:

Place apples in a large bowl and cover with boiling water (you may have to do this in batches). 

This will remove the waxy coating and help the toffee to stick. 

Dry thoroughly and twist off stalks. 

Push a wooden skewer into the stalk end of each apple.

Line two trays with baking paper. 

Place sugar and water in a heavy-based saucepan over a low heat. 

Cook, stirring continuously, until sugar has dissolved. 

Bring to the boil and stir in cream of tartar and food colouring. 

Reduce heat to low.

Simmer toffee for 20 minutes or until it reaches hardcrack stage. 

Check by dropping a teaspoon of toffee into a glass of cold water. 

If the toffee solidifies and cracks easily, it's ready (it shouldn't feel sticky).

Remove from heat immediately.

Working quickly and carefully, dip and twist each apple in toffee until covered, let any excess drip away, then place on baking paper to harden. 

You may have to heat the toffee a little if the temperature drops and it starts to feel too thick. 

Leave toffee to cool before eating.

Can be made up to two days in advance and stored in a dry place.

Sent from my BlackBerry®

Two months already?!

Aidan was officially two months on Wednesday but instead of celebrating we are spent the day at the hospital where they ran a battery of tests to try and figure out why feeding our little man is so traumatic…(really bad reflux and needed to rule out other problems also xrayed chest to make sure it all healed) he was such a trooper I was beaming with pride…

Here is this month’s catch up;

APPEARANCE: weighing 5.45kg and 59cm tall he is certainly growing well and turns out he has dimples (you can see when he smiles,which isn’t that frequent yet)

PERSONALITY: He has been sick so it is not easy to say what he is like, but when he is not feeling poorly Aidan can talk and kick up a storm…he has the cutest smiley face but you don’t get to see it often as he has to take a liking to you first , everyone including toys get his “frowny confused” or “stop annoying me” look though. He gets his selective socialising from his dad. *can’t look face*

ROUTINE: There is currently no routine because he is sick, mostly it is trying to console him and checking on him so he doesn’t choke on his spit up. He is awake much more now though and so cute

LOVES: Licking things! He has new lizard-like habit of tasting things, mostly his blanket, hands and my tops, whenever he is settled and content its almost a given that his tongue will poke out soon.

DISLIKES: Being tired! The scratching and kicking is getting old in my opinion but that’s how he settles *yawn*

FIRSTS: He stands on his very strong legs when being held and lifts head during tummy time…he grabs hold of things, smiles and laughs (when he feels like it) and copies you when stick out your tongue or make “kissy face”

MOM: I’m finally getting out and even went to a party last week.. But generally I just hang out with Aidy and the “bed head” look I’m sporting is not cute or ironic, I just don’t have time…really want to take up jogging and squash again though (not a fan of my current size) but will need to wait for Aidy to feel better…

Sent from my BlackBerryยฎ

Diy for baby

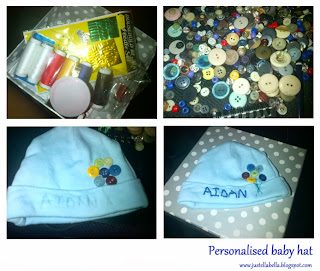
I decorated this hat a week before baby made his arrival so he could have something "personalised by mom" to wear and I would have a little keepsake once he outgrew it (think he is going to outgrow it pretty soon)

I chose a super easy "name and baloons theme" here is how I did it:

MATERIALS:

A basic blue beanie

Buttons (I love buttons)

Pencil

Needle and thread

HOW:

Write name on hat with pencil and arrange buttons in shape of bunch of balloons then using your favourite (easiest) stitch sew over the pencil marks…that's it! easy peasy

Sent from my BlackBerry® wireless device

Super easy scones

The other morning (afternoon) I woke in the mood to bake something, but knowing I had limited time and limited ingredients I needed something quick&basic, so enter these super easy scones ๐Ÿ™‚ yummy ๐Ÿ™‚

INGREDIENTS:
plain flour, for dusting
3 cups self-raising flour
80g butter
1 cup milk
your favorite topping, to serve

HOW TO:
– Preheat oven to 200°C. Lightly dust a flat baking tray with plain flour.
– Sift self-raising flour into a bowl.
– Using your fingertips, rub butter into flour until mixture resembles breadcrumbs.
– Make a well in the centre. Add 1 cup of milk.
– Mix until mixture forms a soft dough, adding more milk if required.
– Turn onto a lightly floured surface. Knead gently until smooth (don't knead dough too much or scones will be tough).
– Pat dough into a 2cm-thick round. Using a 5cm (diameter) round cutter, cut rounds.
– Place scones onto prepared baking tray, 1cm apart.
– Sprinkle tops with a little plain flour.
– Bake for 20 to 25 minutes or until golden and well risen.
– cool and serve
NOM NOM NOM

Shooting my sister :)

I’ve really missed taking pictures, so yesterday I decided to dust off my camera and (with Aidan along for the ride) take some pictures of my sister.
She is thinking of starting a fashion/outfit blog so it was perfect timing ๐Ÿ™‚
Here are some of the pics :